Using Kubernetes for development containers
Contents
In this post I show how you can setup a Kubernetes pod for reproducible development purposes on a single-node Kubernetes cluster using Rancher Desktop on Linux or Docker Desktop for Windows.
What are devcontainers?
At my quasi-hypothetical workplace, we are fans of Visual Studio Code’s development containers idea, or devcontainers for short.
In short, you add a specially crafted devcontainer.json file (and some docker
yamls) to your repo, and the next time a new dev opens the project, they will
be prompted by their VSCode whether they would like to have the whole
development environment setup automatically.
Upon confirmation, VSCode will bring up a cluster of different containers using docker-compose (it can also be a single container), and attach the dev to a special container that makes out part of the cluster. That container already has all system dependencies installed, and the checked-out source code is bind-mounted into it from the host system.
In many cases, the new dev can be making changes and seeing the effects on their multi-service development setup within an hour, and will then have a much better ramp-up procedure as they have a working system to experiment with.
Can we use Kubernetes instead of docker compose for this?
At this same quasi-hypothetical workplace, we might or might not be migrating the production deployment of some of our products from docker-compose to kubernetes, for fairly good reasons.
This set me to thinking: Would it be possible to get a devcontainer-like setup using a local Kubernetes installation on one’s development machine?
The main reason for this would be to get our development setups as close as possible to the deployment setups.
The answer to the question is fortunately:
Why yes, you can use Kubernetes for a devcontainer-like setup, and it works pretty well, also for VSCode remote development!
Demonstration
To demonstrate this, we’re going to create a Kubernetes pod with two containers that can be used to work on dbwriter Python, part of my comparison of different languages for creating minimal APIs.
You can check out the git repo to follow along.
One container will hold the Python development environment, and the second is for the PostgreSQL 14 database with persistent storage.

Figure 1: Diagram of the single-node single-pod Kubernetes setup we’re building. Click for SVG. Thanks Excalidraw!
This proof-of-concept was done using Rancher Desktop on Linux (Ubuntu 20.04), which I can thus recommend for this purpose.
Note that I started the work with Rancher Desktop 0.6.1 on Windows with WSL2,
but ran into many issues, most notably not being able to build the
mcr-focal-fixed image (below) using nerdctl, which showed errors unmounting
a nerdctl.tmp directory, after that read failed 5: I/O error and then after
that simply blocked forever (grr). A “factory reset” of rancher desktop did not
help. I filed this github issue to document the problem.
UPDATE on 2021-11-22: I ended up getting the whole business running on Windows as well, but using Docker Desktop. The procedure is slightly different for image building, and for mounting your source code from the host into the Kubernetes pod. In the following, I’ll use DD4W and RD4L to denote respectively Docker Desktop for Windows and Rancher Desktop for Linux.
Create docker image with updates to MCR focal devcontainer
In order to update Python, install Poetry, and install Postgresqlu-related dependenceis, we tweak the Microsoft Ubuntu Focal devcontainer image using the following Dockerfile:
|
|
On RD4L, we need to build this, and make available under the k8s.io namespace so
Kubernetes can find it. We use nerdctl, Rancher’s docker work-alike:
|
|
On DD4W use the more straight-forward:
|
|
Create and set namespace
First create a new namespace to contain all the resources you’re going to create, and then set it as the default:
|
|
DD4W: Install the local-path-provisioner
On Rancher Desktop the local-path provisioner, which we use as storage for PostgreSQL, is built-in.
On Docker Desktop for Windows we have to install the provisioner ourselves by doing the following:
|
|
Create the devcontainer pod
RD4L: Edit the code-volume hostPath.path in the pod resource shown
below. This is simply the source code directory that you want to have available
inside the devcontainer.
DD4W: 1. You have to mount --bind the source directory you want to have
available inside the devcontainer onto a directory of your choosing on
/mnt/wsl/. 2. The directory that you specify in the resource spec is a
slightly transformed version of your /mnt/wsl location. See the comments in
the resource spec below.
After you have made the necessary changes, create the pod as follows:
|
|
You can keep an eye on the pod being created with:
|
|
(Pro-tip: I use zsh auto-completion to help me type out these commands quickly.)
You should end up with the pod in the “running” state.
|
|
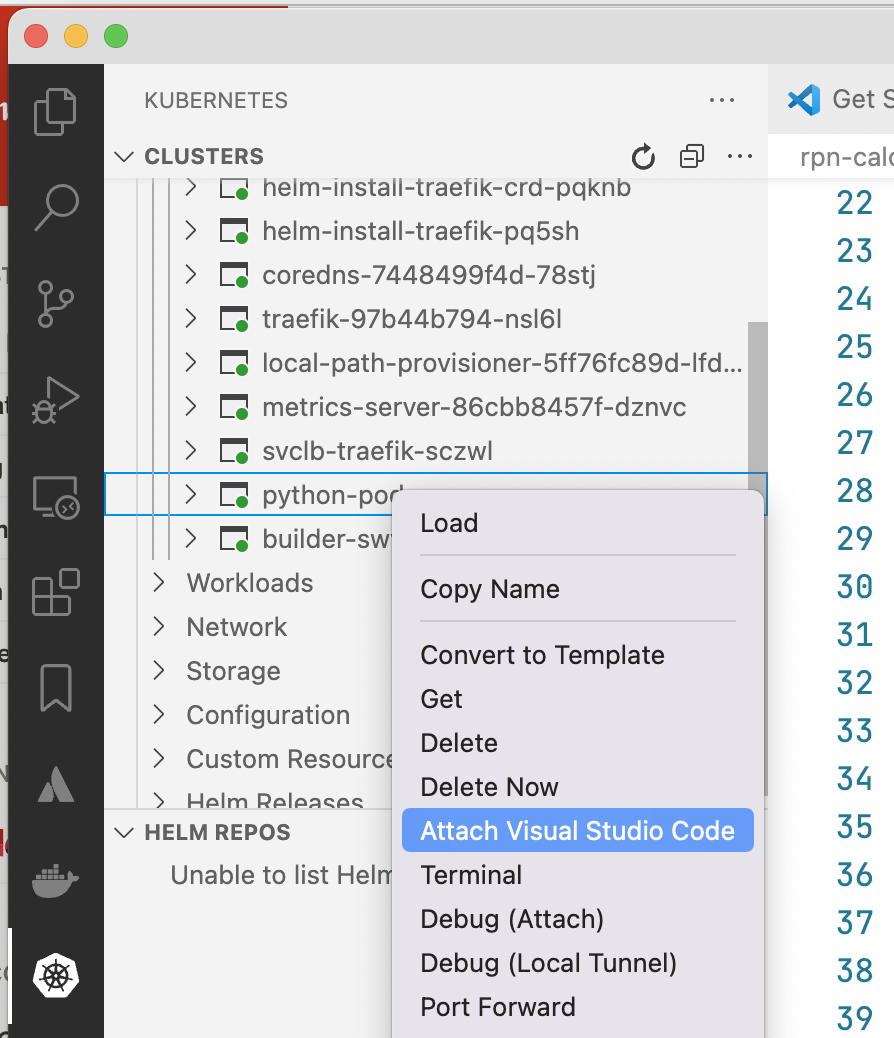
Attach to the Pod using Visual Studio code
With the Kubernetes (ms-kubernetes-tools.vscode-kubernetes-tools) and Remote
Containers (ms-vscode-remote.remote-containers) extensions installed, you’ll
be able to get a list of pods, right click on python-pod, and select “Attach
Visual Studio Code”, at which point you’ll have to select python-container
from the drop-down:
Once your new VSCode window opens on the inside, select “Open Folder” and
enter /workspace – this is where Pod resource above has mapped through your
source directory.
Create a terminal (Ctrl-Shift-backtick) inside the attahced pod, and then
setup the Python environment using the pre-installed poetry:
|
|
I’ve setup a cache-volume in the pod resource for the Poetry virtual environment and packages which will speed up future invocations.
You will also have to install the Python extension into the container, and then select the Poetry-installed virtual environment. This should remain intact for the pod lifetime.
Hopefully in future, VSCode will make its devcontainer.json pre-customization
functionality available also for the customization of Kubernetes containers.
Start the FastAPI server for development
In the pod terminal, create the required PostgreSQL users and tables (the
postgresql container, because it’s in the same pod, is conveniently also on
localhost):
|
|
… and start the FastAPI server in development mode:
|
|
Thanks to the NodePort service we have setup (see the pod resource yml), you
can now connect to the running server by connecting to
http://localhost:30080/docs
If you make changes to main.py, you’ll see the dev server update, and the
changes will be available via the web-browser.
Bonus round: Connect remotely for great success
I often have my Rancher Desktop Kubernetes cluster running on my Ryzen desktop at home whilst at the office for meeting days with my MacBook Air.
It would be really great to be able to develop remotely against that Kubernetes cluster, wouldn’t it? :)
To do this, I copied ~/.kube/config from the Ryzen machine to my MacBook.
I did have to set insecure-skip-tls-verify: true and comment out server
certificate-authority-data due to this error:
|
|
Which in this case is acceptable, because it’s a dev setup, and the home desktop is only available through VPN. However, I would like to get it fixed the right way, so please let me know in the comments if you know exactly how.
After this, the Kubernetes extension on my MacBook’s VSCode showed me the home cluster, and I could connect in exactly the same way to the Python “devcontainer”!
DD4W extra steps
If you want to connect remotely to the DD4W Kubernetes port, there are at least two extra steps (see William J Bowman’s excellent blog post):
-
Forward inbound requests to localhost
This is so that requests from the external network to your Windows machine get forwarded to localhost, from where they will get forwarded by WSL to the running WSL instance:
1 2$PORT = 6443 netsh interface portproxy add v4tov4 listenport=$PORT listenaddress=0.0.0.0 connectport=$PORT connectaddress=127.0.0.1
-
Create an inbound firewall rule
Be careful when you do this. In my case, the machine in question can only be reached via authenticated VPN connection.
In short, go to Firewall & network protection -> Advanced settings -> Inbound rules, and add a rule to allow inbound TCP traffic to port 6443.
Conclusion
We have just demonstrated that using a single node Kubernetes cluster, you can setup a devcontainer-like pod containing the multiple containers you need, with source code shared from your development machine.
It’s not as slick as devcontainers (yet?), but you could easily share a few Kubernetes yamls with a Kolleague or a Kollaborator (haha), and have them up and running in not too much time.
As a bonus, you can connect to this whole business remotely when you’re out and about with your small and light hardware.
The big advantage here is that the Kubernetes resource specification used for deployment and for development can be brought closer to each other.