Improving fastai's mixed precision support with NVIDIA's Automatic Mixed Precision.
Contents
TL;DR: For best results with mixed precision training, use NVIDIA’s Automatic Mixed Precision together with fastai, and remember to set any epsilons, for example in the optimizer, correctly.
Background
Newer NVIDIA GPUs such as the consumer RTX range, the Tesla V100 and others have hardware support for half-precision / fp16 tensors.
This is interesting, because many deep neural networks still function perfectly if you store most of their parameters using the far more compact 16-bit floating point precision. The newer hardware (sometimes called TensorCores) is able to accelerate further these half precision operations.
In other words, with one of the newer cards, you’ll be able to fit a significantly larger neural network into the usually quite limited GPU memory (with CNNs, I can work with networks that are 80% larger), and you’ll be able to train that network substantially faster.
fastai has built-in support for mixed-precision training, but NVIDIA’s AMP has better support due to its support of dynamic, instead of static, loss scaling.
In the rest of this blog post, I briefly explain the two steps you need to take to get all of this working.
Step 1: Set epsilon so it doesn’t disappear under fp16
I’m mentioning this first so you don’t miss it.
Even after adding AMP to your configuration, you might still see NaNs during network training.
If you’re lucky, you will run into this post on the PyTorch forums.
In short, the torch.optim.Adam optimizer, and probably a number of other
optimizers in PyTorch, take an epsilon argument which is added to possibly
small denominators to avoid dividing by zero.
The default value of epsilon is 1e-8. Whoops!
Under fp16 encoding, 1e-8 becomes 0, and so it won’t really help to fix
your possibly zero denominators.
The fix is simple, supply a larger epsilon.
Because I’m using fastai’s Learner directly, and this takes a callable for
the optimization function, I created a partial:
|
|
Step 2: Setup NVIDIA’s Automatic Mixed Precision
fastai’s built-in support for mixed precision training certainly works in many cases. However, it uses a configurable static loss scaling parameter (default 512.0), which in some cases won’t get you as far as dynamic loss scaling.
With dynamic loss scaling, the scaling factor is continuously adapted to squeeze the most out of the available precision.
(You could read sgugger’s excellent summary of mixed precision training on the fastai forums.)
I was trying to fit a squeeze and excitation ResNeXt-50 32×4 with image size 400×400 and batch size 24 into the 8GB RAM of the humble but hard-working RTX2070 in my desktop, so I needed all of the dynamic scaling help I could get.
After having applied the epsilon fix mentioned above, you will then install NVIDIA Apex, and finally make three changes to your and fastai’s code.
Install NVIDIA Apex
Download and install NVIDIA Apex into the Python environment you’re using for your fastai experiment.
|
|
If apex does not build, you can also try without --cuda_ext --cpp_ext, although it’s best if you can get the extensions
built.
Modify your training script
At the top if your training script, before any other imports (especially anything to do with PyTorch), add the following:
|
|
This will initialise apex, enabling it to hook into a number of PyTorch calls.
Modify fastai’s training loop
You will have to modify fastai’s basic_train.py, which you should be able to find in your_env_dir/lib/python3.7/site-packages/fastai/. Check and double-check that you have the right file.
At the top of this file, before any other imports, add the following:
|
|
Then, edit the loss_batch function according to the following instructions and code-snippet. You will only add two new code lines which will replace the loss.backward() that you will be commenting out.
|
|
All of this is merely following NVIDIA AMP’s usage instructions, which I most recently tested on fastai v1.0.42, latest at the time of this writing.
Results
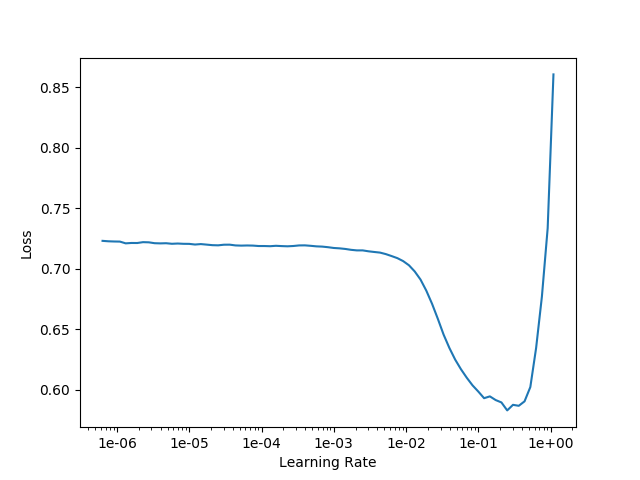
If everything goes according to plan, you should be able to obtain the following well-known graph with a much larger network that you otherwise would have been able to.
The below example learning-rate finder plot was done with the se-resnext50-32x4d, image size 400×400, batch size 24 on my RTX 2070 as mentioned above. The procedure documented in this post works equally well on high end units such as the V100.